Every computer display shows colour differently. Some displays are brighter than others, some show more intense blues while others may not, etc.

Not only does your display differ to everyone else’s (including ours), but computer displays are far brighter and show many more colours than a printer can reproduce. So that wonderful bright yellow flag that you’ve taken a photo of will not be as bright and won’t be the exact yellow, not just because of computer display differences, but because it’s possible the printer simply can’t print that shade of yellow.
So two things need to be taken into account.
- Getting your display to represent colour as accurately as possible
- Being able to simulate on your calibrated display how colours are going to print on canvas
1) Calibrate your Display
There’s two parts to getting your display to represent colours as accurately as possible. The first part is to get the brightness and contrast settings right. The second part is to get the colour right.
Shortly, we’ll add in some information on how to use the in-built colour system in OS X and Windows. These systems which are part of your operating system allow you to create a colour profile of your display.
In the mean time, below is a simple way to calibrate the brightness / contrast of your display.
Firstly, let’s get the contrast setting right. The image below shows eight different shades of light grey, ranging from 240 to 245. Value 255 would be pure white so value 245 is 1 step from pure white.
Set the CONTRAST of your display so you can just barely see the difference between pure white and value 254. Usually, you’ll need to set your CONTRAST to 100%. If you can’t find a CONTRAST setting where you can see the difference between pure white and value 254 then try getting it so you can see the difference between pure white and value 253.
On a “good” display you should be able to see the difference between pure white and value 254. If you can only see the difference between pure white and a value lower than 254 then your display is “not so good”. This isn’t the end of the world. It just means that the whites you are seeing on your display are likely going to be different to the whites we see on our high-quality, calibrated displays.

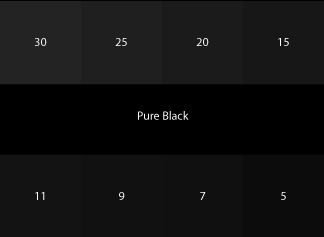
Next, let’s adjust the BRIGHTNESS of your display
Set the BRIGHTNESS of your display so you can just barely see the difference between pure black and value 5. Usually, you’ll need to set your BRIGHTNESS to 50%. If you can’t find a BRIGHTNESS setting where you can see the difference between pure black and value 10 then try getting it so you can see the difference between pure black and value 7.
On a “good” display you should be able to see the difference between pure black and value 5, AND you should be able to still see the difference between pure white and value 254. If you can only see the difference between pure black and a value higher than 5 then your display is “not so good”. This isn’t the end of the world. It just means that the blacks you are seeing on your display are likely going to be different to the blacks we see on our high-quality, calibrated displays.

Now that you have your display’s CONTRAST and BRIGHTNESS set as best as possible, the chances of seeing more accurate colour on your display is higher.
Unfortunately though, it’s not as simple as that as each display shows colours differently and most displays don’t have individual red, green and blue colour adjustments. The only way to get all the colours as accurate as possible to create a colour profile of your display. This can be done using the in-built colour management software in OS X and Windows. The best way is to purchse a display calibration tool called a spectrophotemer (spectro for short). A spectro is a device that measures the colours on your display and creates a very accurate colour profile. The colour profile is used to modify how colours are shown on your display to ensure they are as accurate as possible.
2) Download our colour profiles
Genius Printing uses custom calibrated colour profiles on every piece of equipment to create a completely colour calibrated workflow. To be able to see on your screen an indication of how your image will be printed onto canvas you should download our printer profile and install it on your computer – that’s all part of the Standard Service. If you’d like assistance in using these profiles you’ll need our specialist service (see below).


